Archive for the ‘bath’ Category

an idea starts to come together

Friday, January 18th, 2013

It’s been a while since we went to the bathroom together. David and Joe have been making progress on the built-ins in there, so maybe it’s time for a peek — even if it’s not quite done yet.

Let’s start at the beginning. A couple of years ago, I handed David a rudimentary scribble of what I pictured for our new bathroom vanity…

my first sink scribble


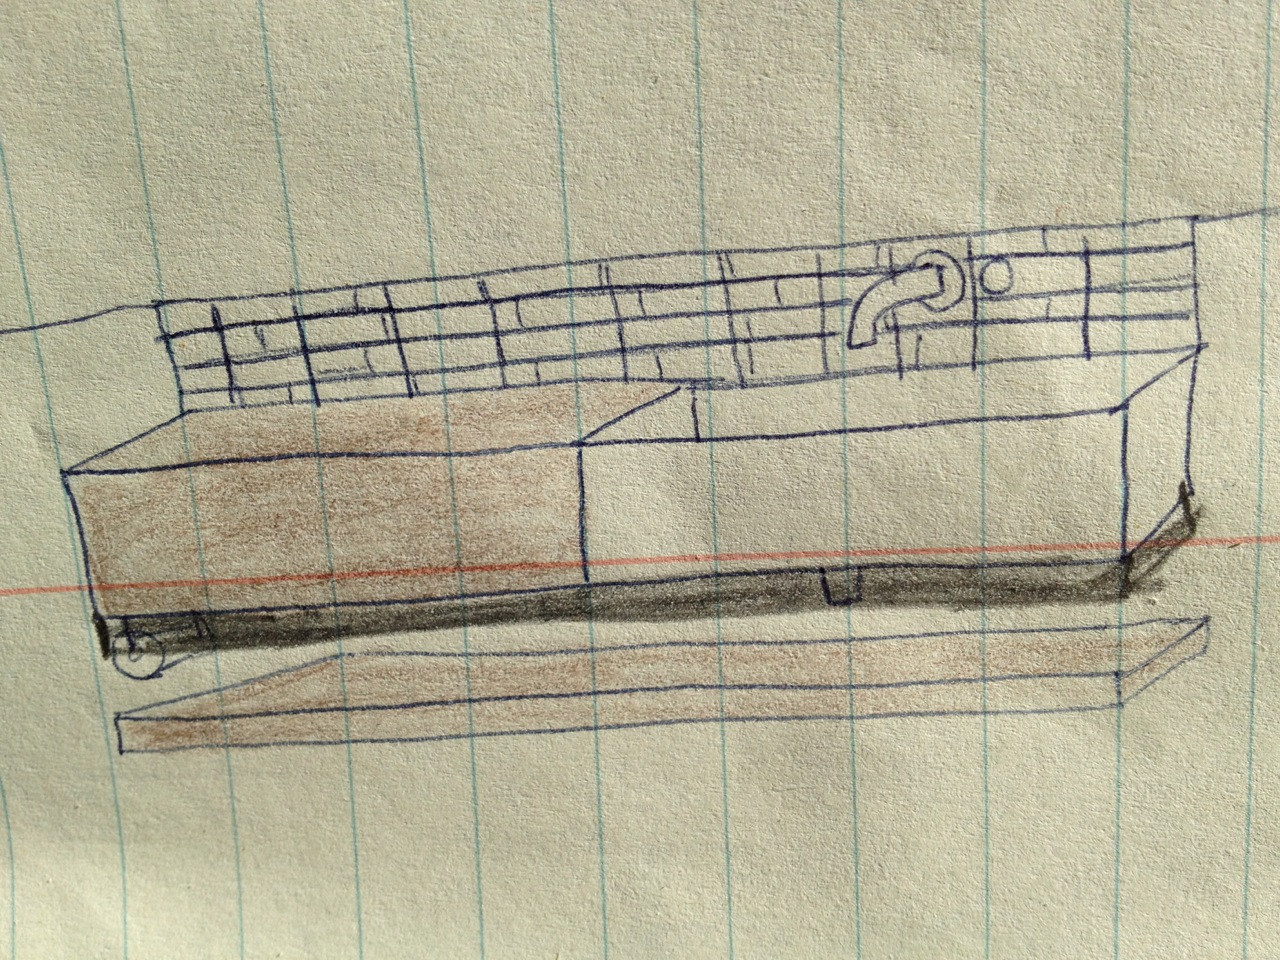
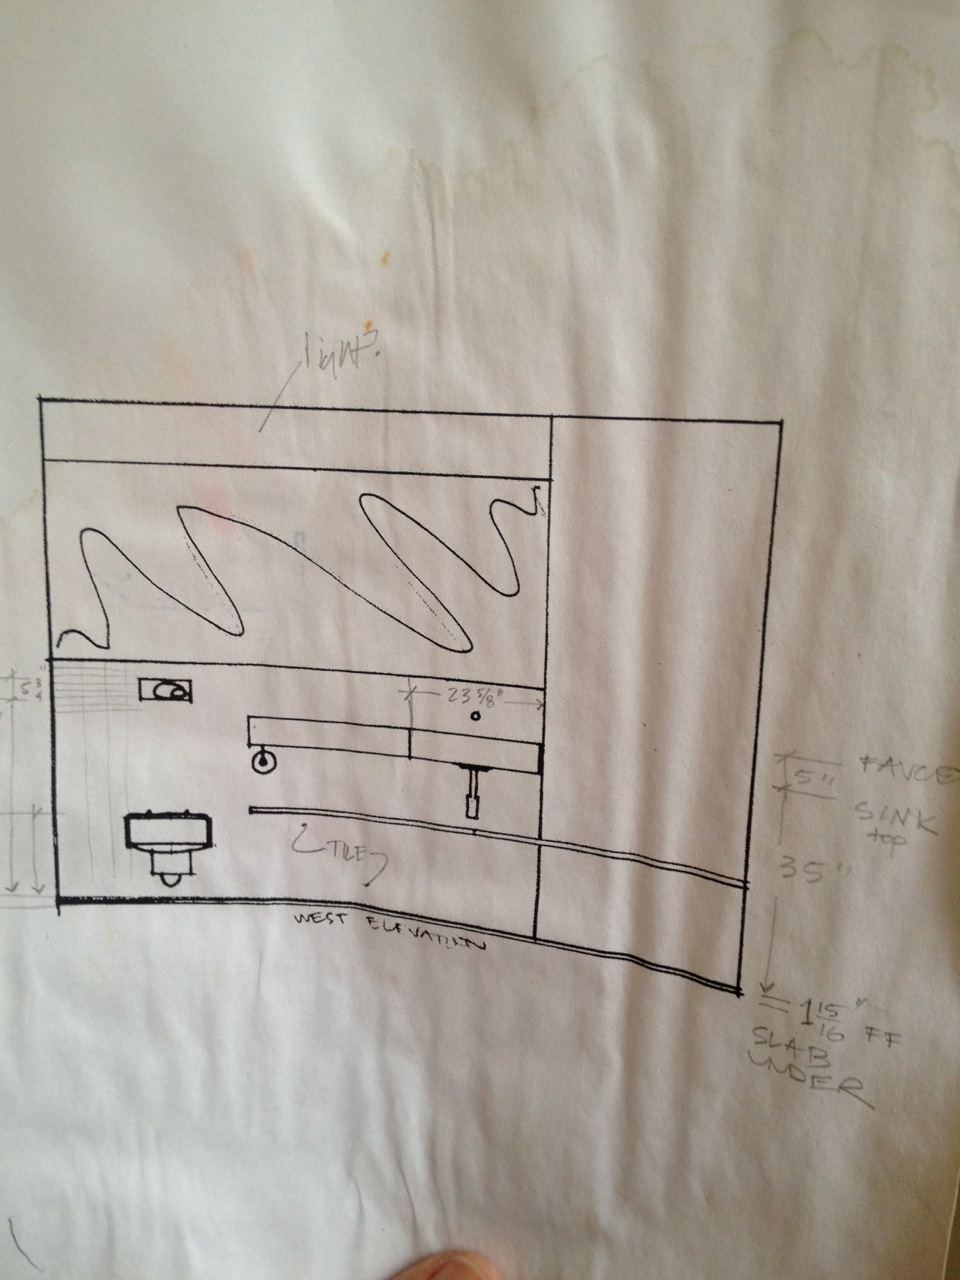
David drew it mo betta with measurements — I know I’ve shown you this before. This includes the shelf/bench and wall of walnut (to the right of the sink) that I was also hoping for…

layout of sink area


Drawing is SO much easier than building. Here comes the hard part.

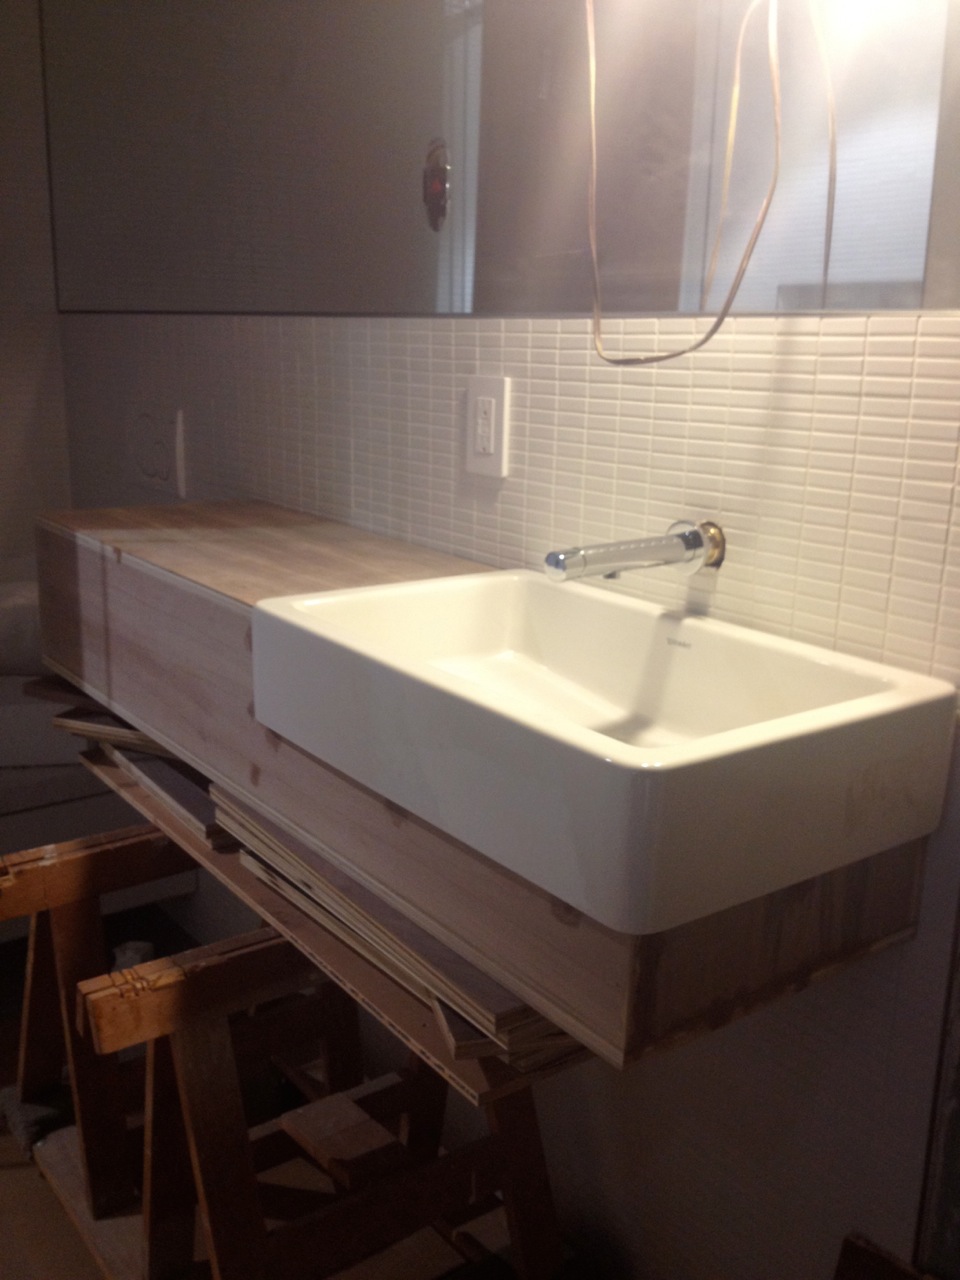
First, there was figuring out the complex, irregular curves of an imperfect  sink — not as right-angled as woodworker might hope — in order to get the wood to mate up with it…

figuring out the curves


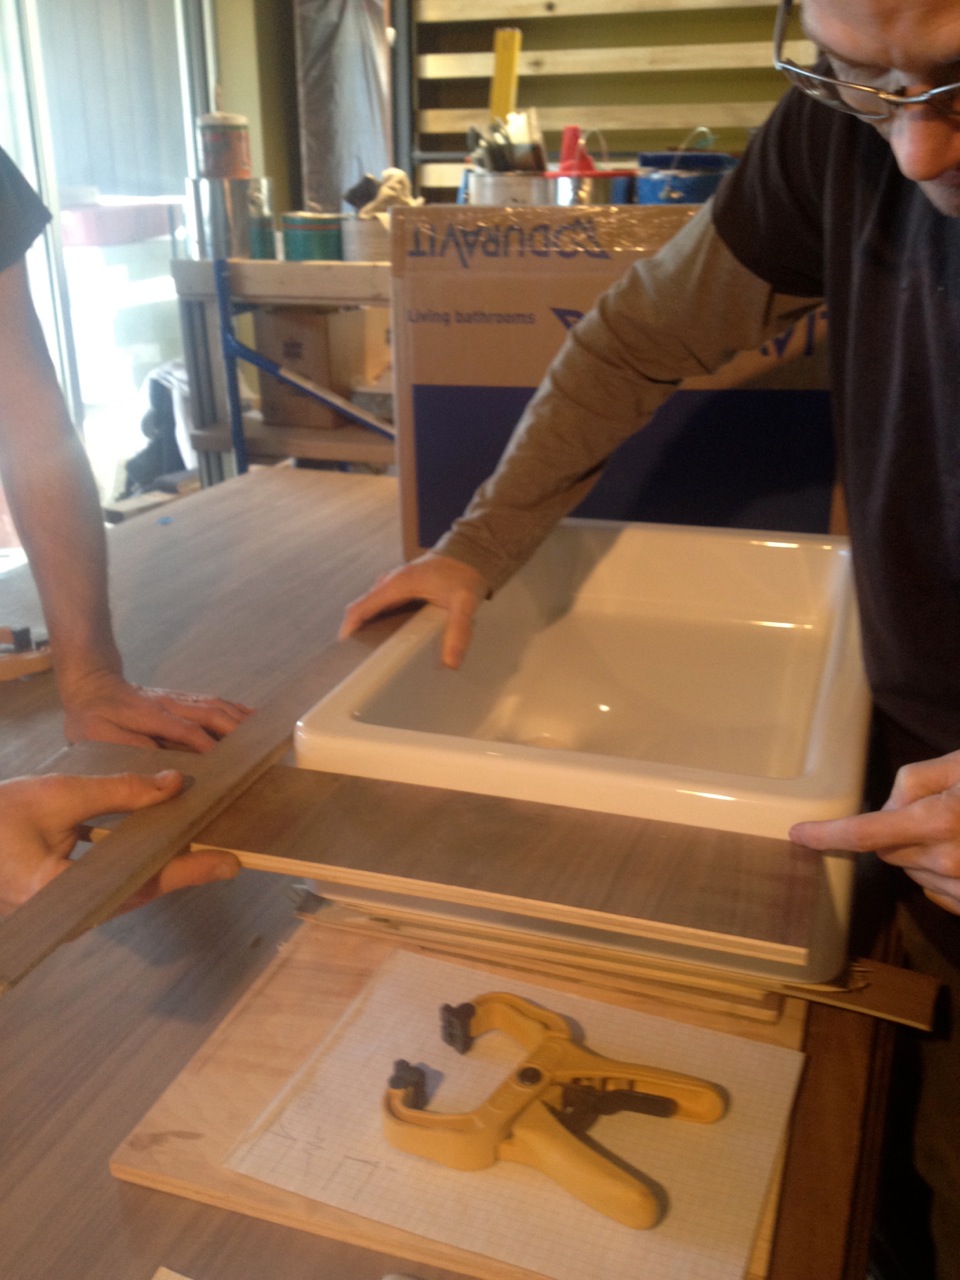
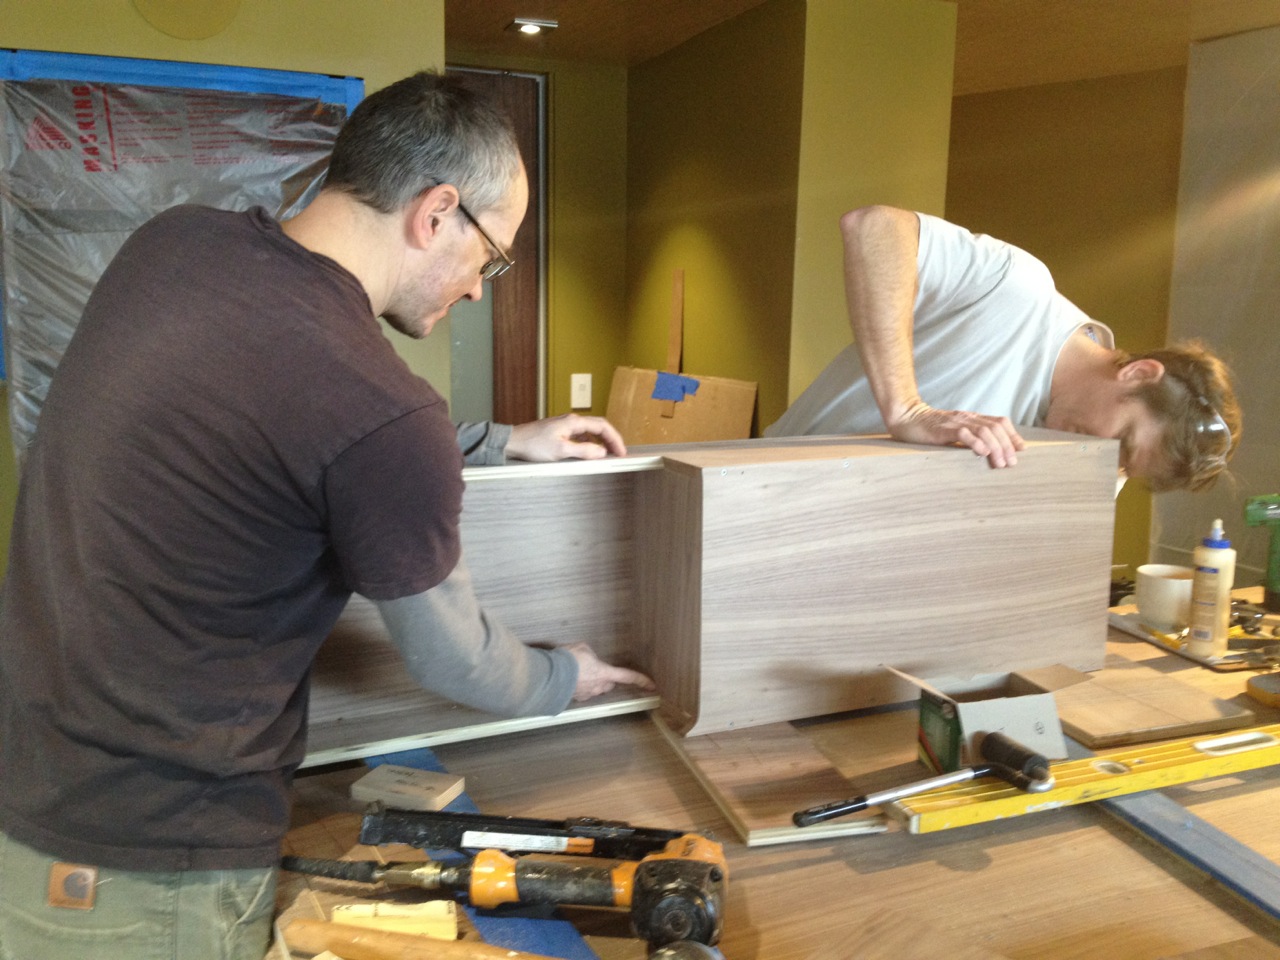
Required some math but they figured it out, as I trusted they would. So they continued on to constructing the vanity box…

building the vanity box


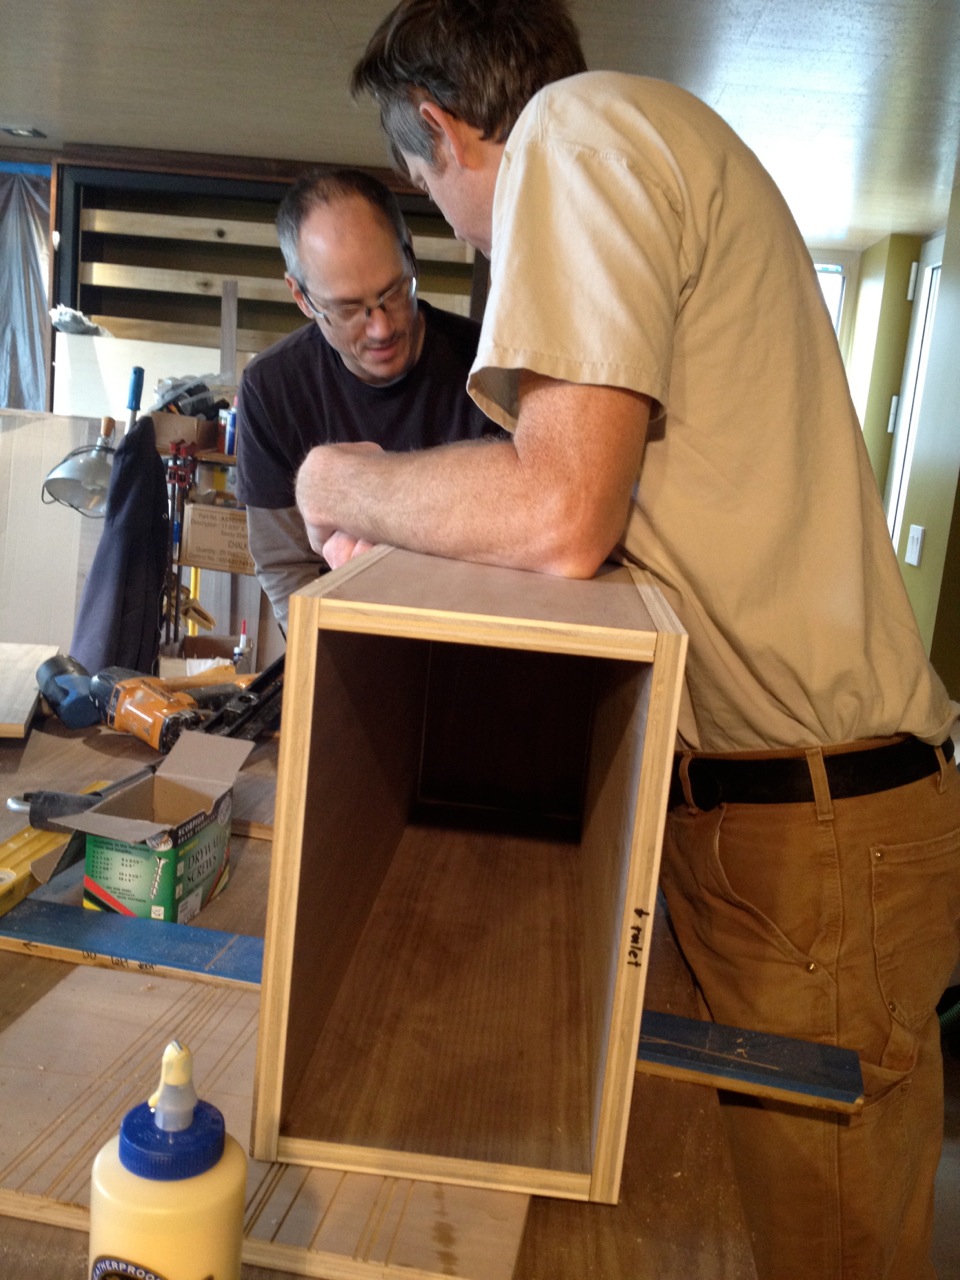
The open end will face the toilet. That’s where the toilet paper and the occasional book or magazine will hide to keep things from getting messy.

Once that was done, they propped the vanity up on sawhorses and made sure it fit the space as intended with the sink and the faucet roughly in place…

testing the sink on the vanity


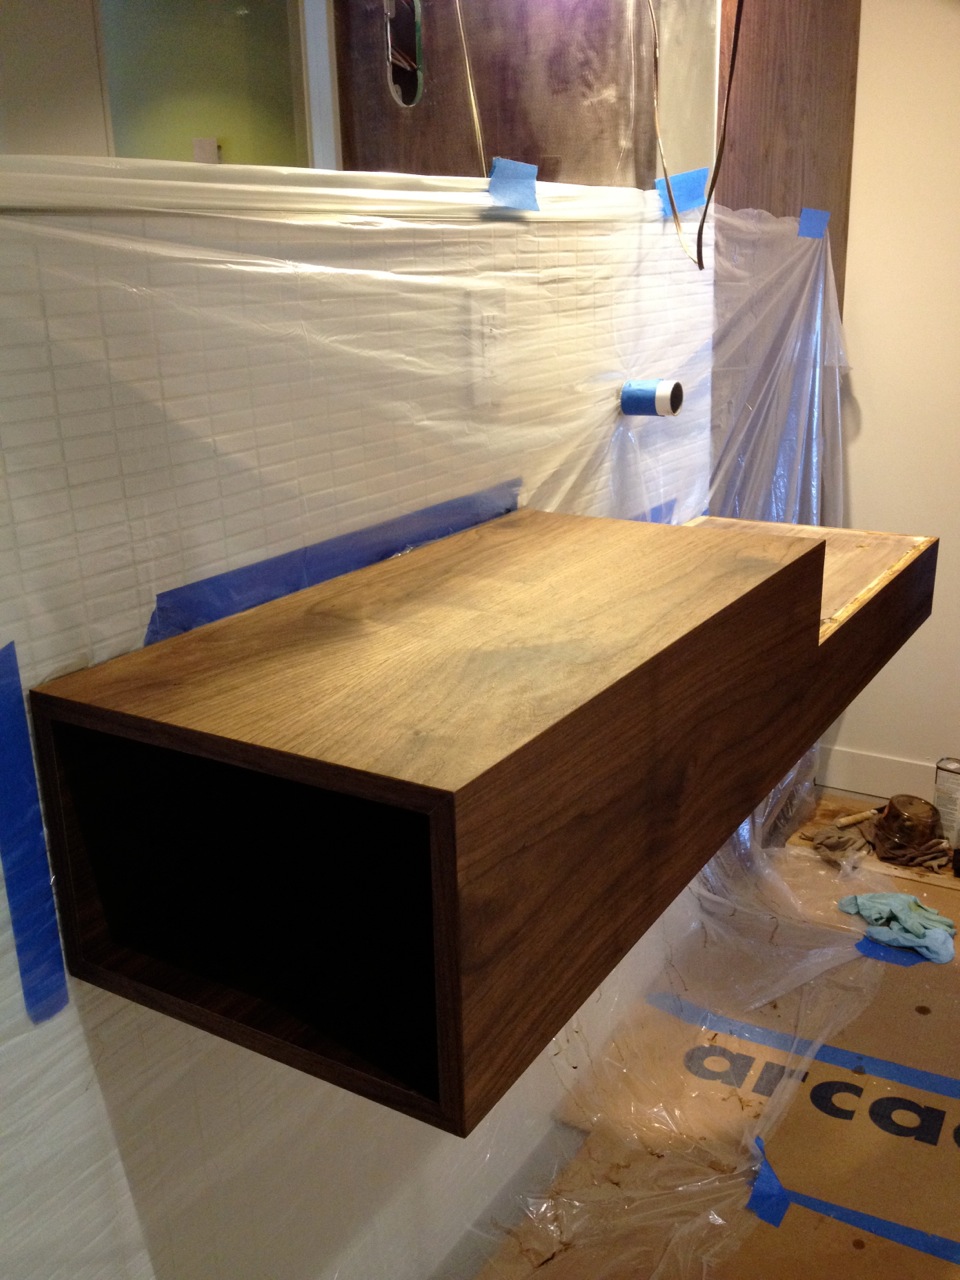
There was the tricky veneering stage…

veneering the vanity


And then they secured to the wall and made the necessary tweaks…

making adjustments


They stained it in place. Here it is with two coats — it still has to be made waterproof (that’s another story)…

hanging the box on the wall


Just to the right of the sink is the walnut panel that will eventually have three hooks on it for hanging up clothes…

walnut panel installed


The bench/shelf that extends from below the sink still needs to be built. But isn’t that gorgeous?!

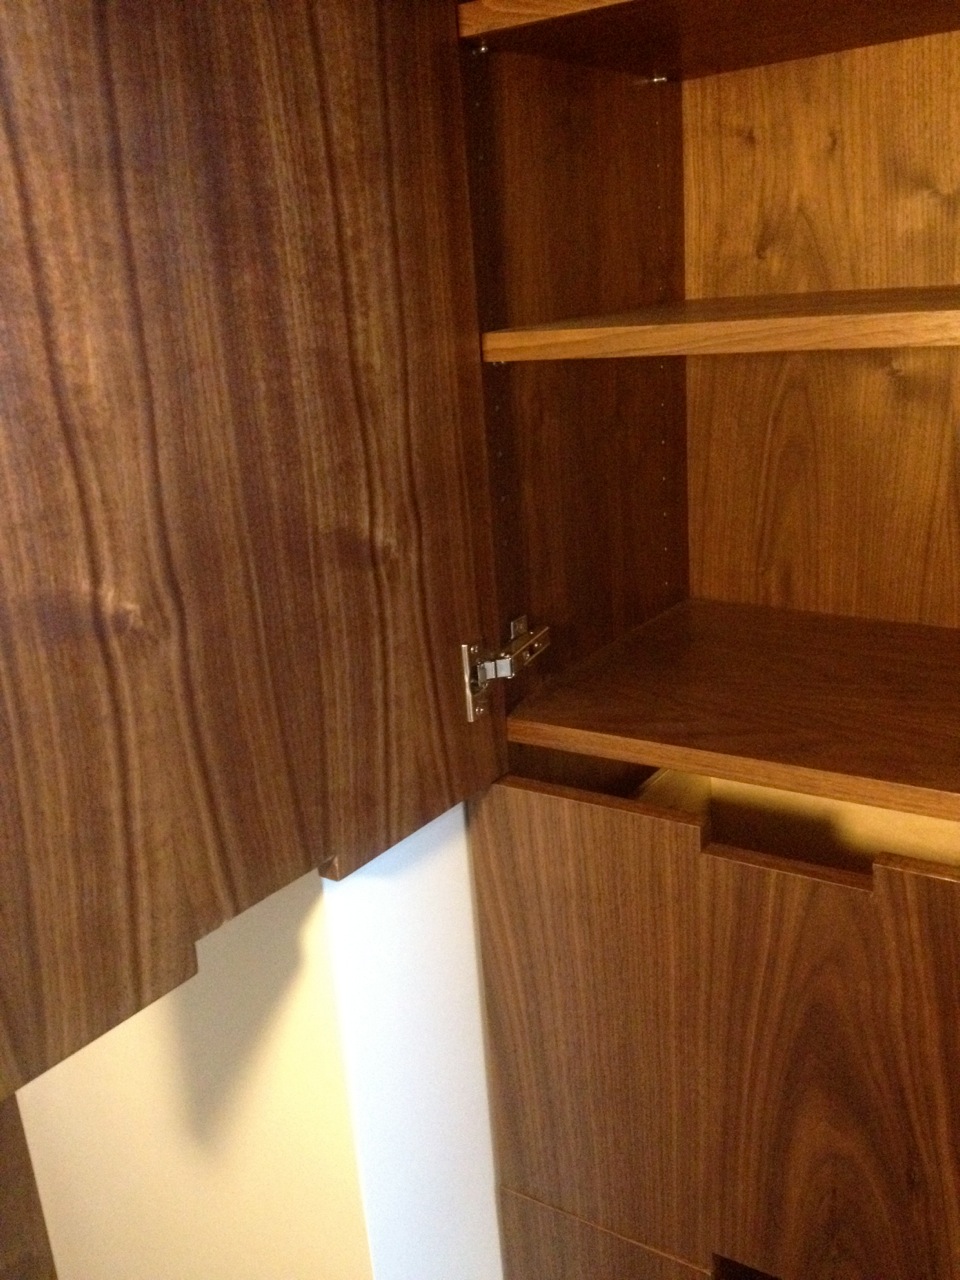
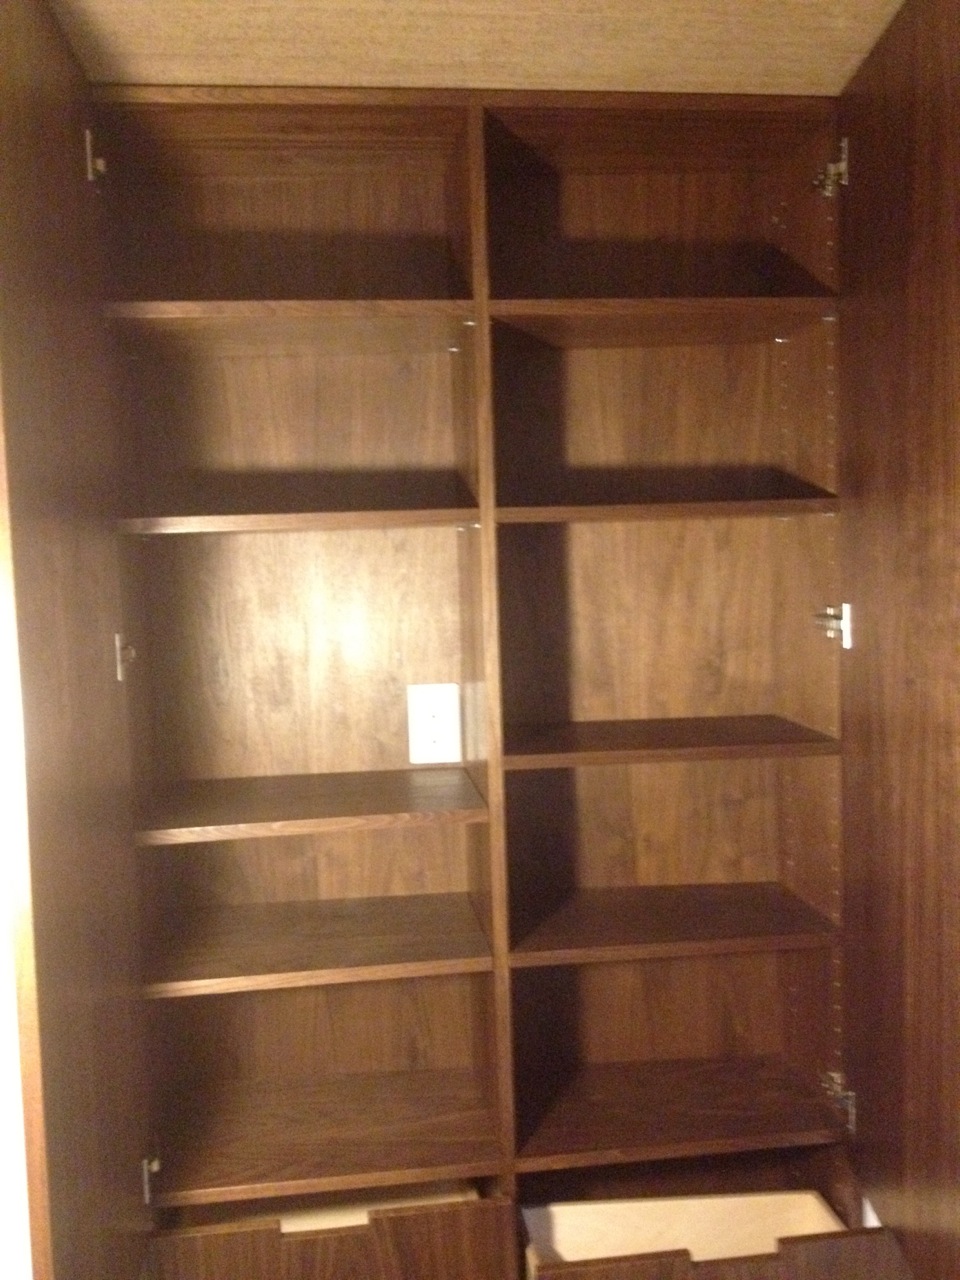
In that same corner there’s now the built-in linen cabinet that David began last June. Just look at that walnut! Love love love.  Just needs a little tweak on that bottom drawer and it’s good to go…

walnut storage wall


Love how the minimal fingerpulls worked out. Perfect…

fingerpulls


Inside, there’s plenty of room for towels and any bathroom paraphernalia…

a look at the shelves


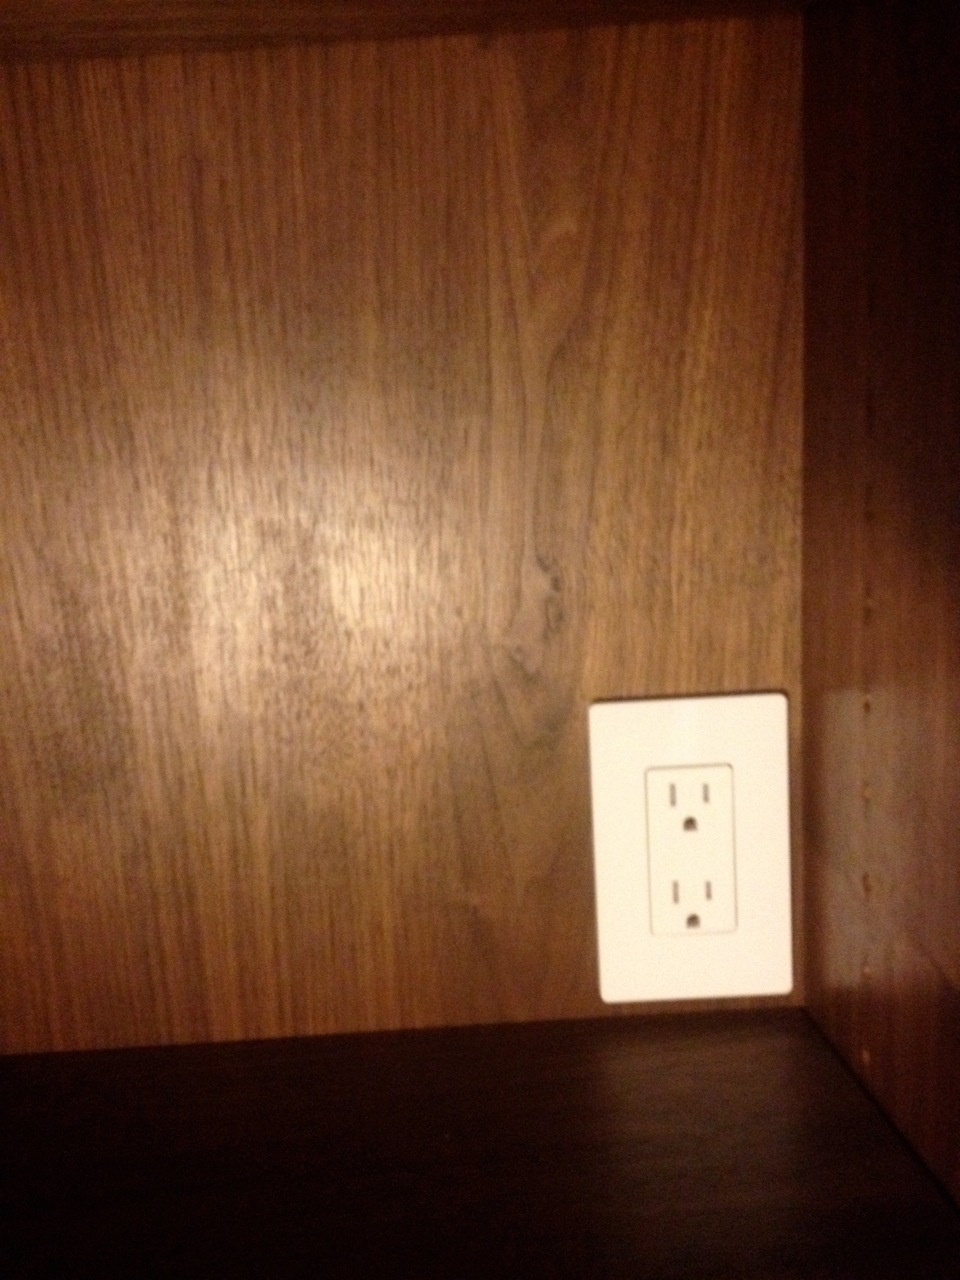
There’s even a recharging station for an electric shaver! So spoiled…

recharging station


The drawers are nice and deep…

nice deep drawers


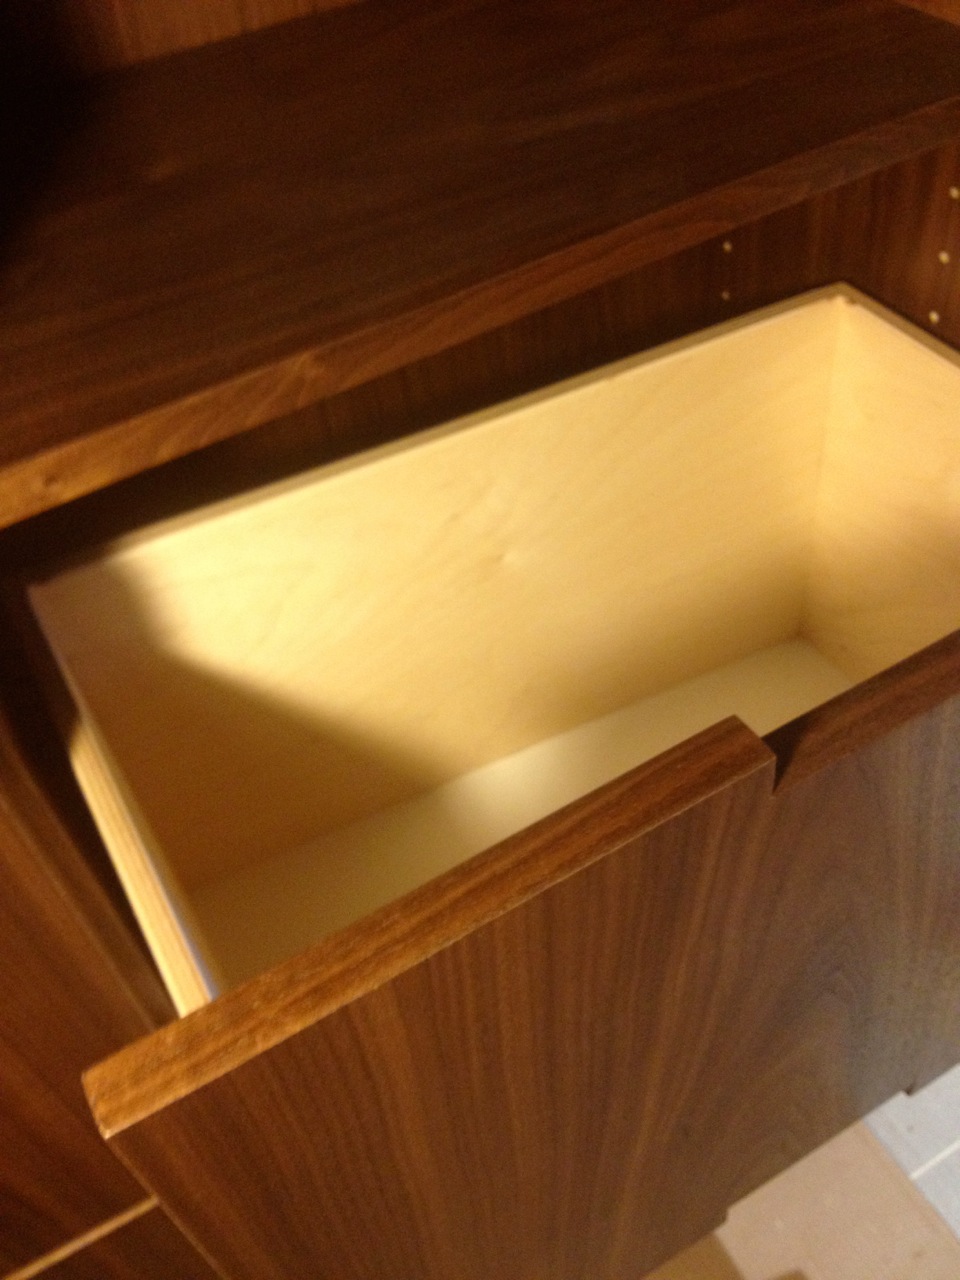
Yes, the back of the cabinet and the drawers are angled to accommodate our angled wall. This should give you a better idea of the wall when you look at the other side. See how the lights are on angle, too?

record storage wall and hallway


Btw, that’s the record storage wall, in progress. More on that another time.

So, back to the bathroom. Here you can begin to get an idea of how the walnut built-ins will look together — in an outage. I need light!

walnut corner


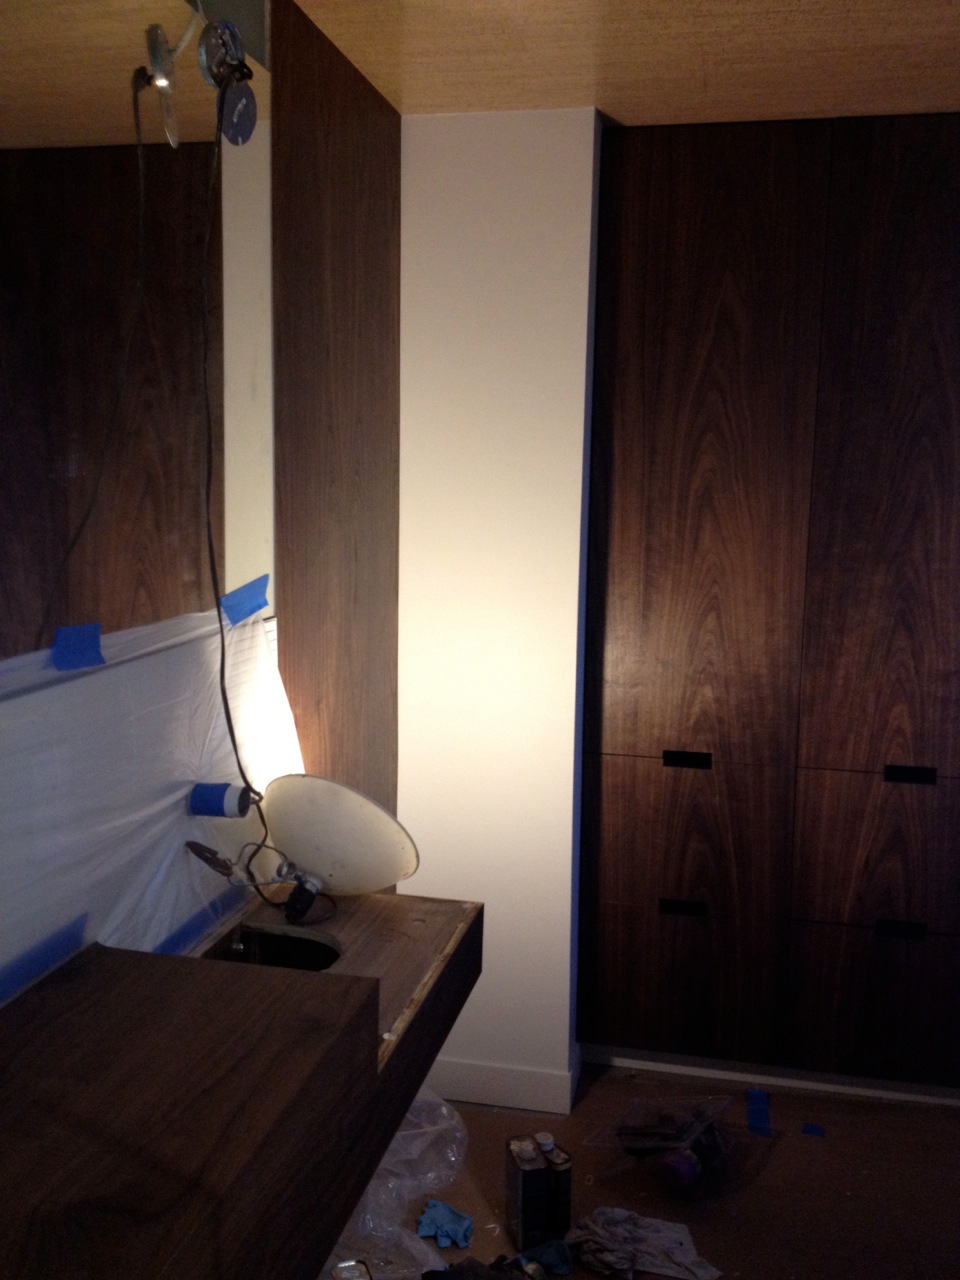
Argh. So impossible to take decent pictures in this tiny bathroom — especially when the lighting isn’t done yet. Oh well.

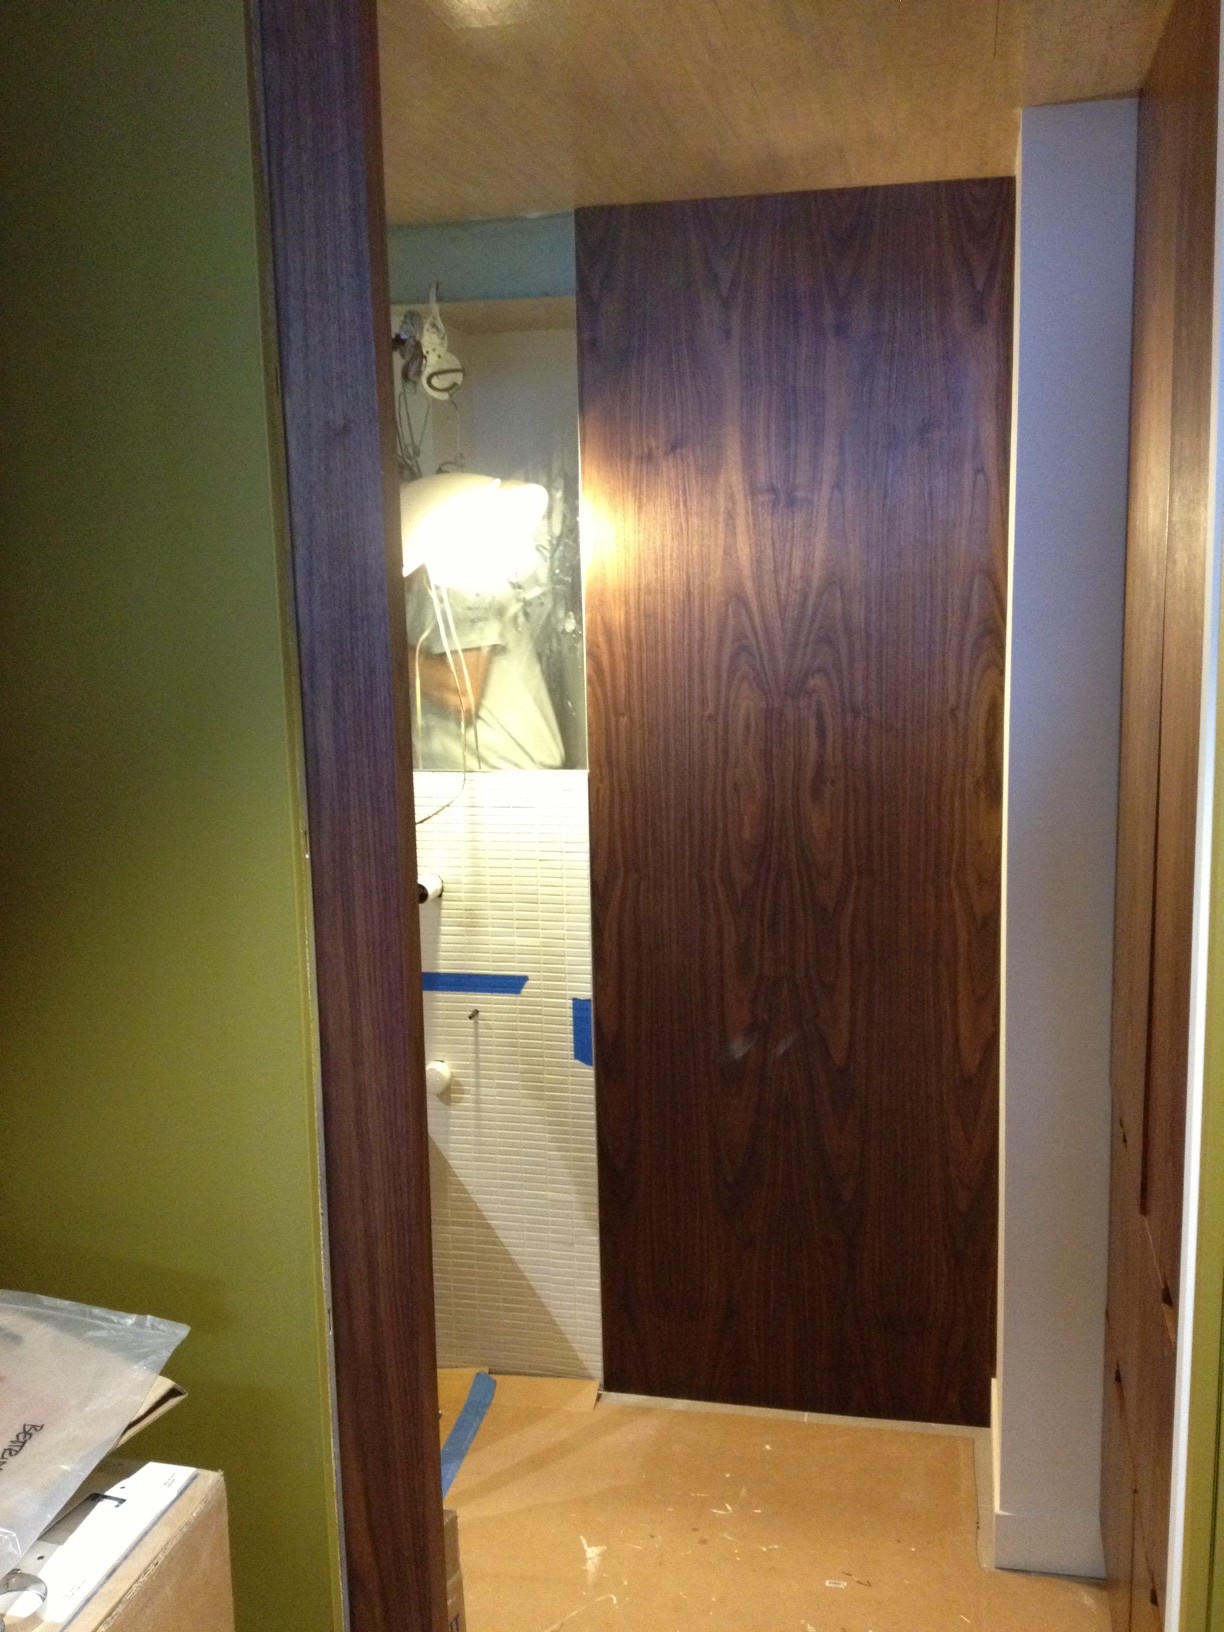
Before I go, take a peek at the fantastic custom pocket door David and Joe designed, built and installed…

custom walnut pocket door


A better look at the door project next week. That’s it for now.


potty time

Friday, November 16th, 2012

I haven’t talked about the work going on in the downstairs bathroom since back in September. I blame slow progress and work eating up all my time. Excuses, excuses. Now that my work is becoming more manageable again, let me show you what’s up down there.

Great news: our shiny new Hans Grohe shower hardware is now installed and working!

the new shower hardware is in


Hans Grohe showerhead


Ooh! Aah!

Caulking between the tile and the ceiling still needs to be attended to… all in due time. The shower controls are on the opposite wall…

the shiny shower controls


The teak slatted shower tray still needs to be made, but that pretty much does it for the shower.

The wall-mounted Duravit Vero toilet is finally in, too. Rectangular! (Try to ignore the construction debris under the toilet.)

Duravit toilet


don’t worry, the hole in the seat is oval... ish


The water-saving dual-flush mechanism got set into the wall. You know, save the planet with every flush. The large button is for #2. The small button is for #1.

the flusher, on the wall


Still to come: the sink and vanity, plus a bench/storage cabinet. And then this room is ready to roll!

back in the bathroom

Sunday, September 23rd, 2012

On Friday, RI Glass delivered and installed the shower glass and mirror for the downstairs bathroom…

the shower glass arrives


The bathroom mirror was installed atop an electronic mirror defogger. It has a heating element to keep the area above the future vanity from fogging up when you take a shower. That’s my clever boy for ya…

the bathroom mirror is in


The oval hole in the glass at top is where the lit shaving mirror will go. Below that will be a regular electrical outlet…

electrical: lighted mirror goes above, regular outlet below


Nice, clean aluminum edge divides the glass from the tile…

aluminum edge between tile and mirror


I think I posted this once before, but here’s a reminder of what this wall will eventually look like…

layout of sink area


At the risk of being repetitive, let me remind you of this:

A walnut box/countertop will be open on the end next to the toilet, so we can stash magazines and toilet paper rolls. (No toilet paper holder like in the drawing.) A walnut shelf will stretch from under the sink to the corner of the room where it becomes a bench. Behind the bench is a floor-to-ceiling wall of walnut with a few hooks up high for hanging clothes.

Over on the opposite wall, the shower got its new frameless shower glass. Hard to get a decent shot in this small bathroom but you can see it’s finally looking like a bathroom!

it finally looks like a shower!


The shower base still needs to be topped by a teak slatted shower tray. Actual shower hardware not installed yet.

As always, tried to keep it fairly minimal in here, which is why we went with a frameless design. The metal bar is bolted to the header to keep the heavy sliding door setup sturdy. Closeup of the hardware at the top…

closeup of the hardware at the top


Closeup of the sliding door track at bottom…

closeup of the bottom


The fixed glass is silicone-mounted right to the tile…

shower glass wall siliconed to the tile


Finger-pull on the sliding glass door. No handle to extend into the skinny room! Have I mentioned lately how much I love this tile?

fingerpull on the sliding glass


The plumber comes next week to make the shower a working thing and install the wall-hung toilet. Woohoo!

hey, look who’s in the shower!


scenes from the woodshop

Thursday, June 7th, 2012

David sends us progress updates from Tim’s woodshop.

The walnut, cut and labeled…

scenes from the woodshop: walnut cut and pieces labeled


Pieces selected for the office area built-ins…

scenes from the woodshop: for the office area built-ins


And pieces for the bathroom cabinet…

scenes from the woodshop: for the bathroom cabinet


More news as it comes in!

what happens in the shower

Friday, June 1st, 2012

… stays in the shower. Pretty sure that applies to the fancypants aluminum edging that now divides the tile and the cork ceiling, because I can’t imagine it escaping its new confines…

aluminum edge between tile and ceiling


Looks good, no?

aluminum edge in the shower too


There’s still more to be done, so don’t be too judgmental yet. The niche will be tiled soon and there’s more metal edge to come. And grout, of course. But I’m loving how it’s coming together so far!

in the bathroom, again

Thursday, May 31st, 2012

Overdue for a check-in on the tiling progress. Let’s see how it’s going down there…

Mark and I figured out the placement of the niche. Actually, the placement of the pipes in the wall figured out the placement of the niche for us…

niche placement


I really had my heart set on a long, skinny niche like this one, but the pre-made offerings were laughably short… we would have had to lay our shampoo bottles on their sides. Once again, had to settle. Sigh…

pre-made niche goes in


niche gets mud


However, it is mudded up and ready for tile, so there’s that.

Meanwhile, the tiles on the end wall almost reach the ceiling…

bath is tiled almost all the way to the ceiling now


And did you happen to notice the aluminum edging?

crisp aluminum edge on the white tiles


Will make a nice, crisp line between the tile and the mirror above, and between the tile and the walnut built-in going to the right of the sink.

The sink, if I can remind you, looks like so…

our duravit sink


Speaking of which, I suppose you haven’t seen the rough layout yet…

layout of sink area


We probably have a nicer scribble than this somewhere… I’ll see if I can dig one up.

Anyway, the top of the white vessel sink will be on level with a walnut box/countertop — the wood will get a heavy-duty coating of something you’d see used on boats. Green? Unlikely. Impervious to water? Most definitely. The box/countertop will be open on the end next to the toilet, so we can stash magazines and toilet paper rolls where no one has to look at them. (No more toilet paper holder like in the drawing.) A walnut shelf will stretch from underneath the counter to the corner of the room where it will also serve as a bench. Behind the bench is a floor-to-ceiling wall of walnut with a few hooks up high for hanging clothes. Built-in storage is planned for the intersecting wall — details later.

So that’s that. Did I mention that the wood for the bath built-ins arrives TOMORROW? Woot!

so how’s it going?

Monday, May 21st, 2012

With the tile, I mean. Like so…

measuring where the tile will fall


And thusly…

tile now wraps around another wall


The tile now wraps around another wall — the wall opposite the shower where the wall-hung toilet will be. The yellow bits in the back corner are plumbing related. Above the yellow bits, that square will be the flusher. In the foreground, the pipe is where the wall-mounted faucet will go above the sink. Trying to maximize our space here wherever we can.

tile check-in

Friday, May 18th, 2012

Mark was back at it yesterday, tiling those walls in the bathroom downstairs…

mark at work


That shot doesn’t really show off his handsome side. I apologize for that. By the end of the day, tile stretched across the full width of the room…

tile by the end of the day


Eventually it will meet the ceiling and this will really start to look like a bathroom. Thanks, Mark!

tile time!

Wednesday, May 16th, 2012

Not too much to show yet but this should give you an idea of how the downstairs bath is coming along since we last checked in. First, Mark “mudded” the walls of the shower — mud is basically a sand and cement mix used for setting our porcelain tiles

walls with just mud


I’m sure there were steps that I didn’t catch on camera through most of this time-consuming and exacting process. It’s a tiny bathroom with tiny tiles that require a bit of concentration… I don’t like to interfere too often.

After the mud dried, the first tiles went on…

walls not too far along yet


And by the end of the day yesterday, a roughly 3′-band all the way around was set…

walls at the end of the day


Nowhere near finished but it’s well begun. Thanks, Mark!

shower with appreciation

Wednesday, May 9th, 2012

I bring up our recent trip to Palm Springs yet again. Last time it was the use of concrete at our vacation rental. This time it’s the tile in the bathroom of the casita next to the pool. Here, the owner took a better photo than I did…

fabulous casita bathroom, from rental site


Swank, eh?

Here’s my shot. A bit dark but you can see the tile better. Don’t let the reflection of me in my swimsuit frighten you… it was 115 degrees by the pool, you know…

lousy shot of a gorgeous shower


I’m sharing this for Mark, our tile superhero, who’s got the downstairs bathroom prepped and has thus far politely entertained our aspirations. By this Friday, the finished cork will have had its full 10 days to dry, and he’ll be back at it again.

So what do I like about this bathroom? It’s light. It’s minimal. The aluminum strip is a nice detail…

beautiful tile


And I like the way they used the aluminum as edging around the shower shelf inset, even if the grout could be a little neater…

aluminum edging on the shower inset


And the edges of the shower stall step…

aluminum edging on the shower base


And the edge of the end tiles…

minimal shower glass clip


I’m not suggesting we add an aluminum strip everywhere, no. But I did think this was a nice detail and solved some of the issues about how to deal with the corners around the shower shelf inset. That is all.

That, and nice tile.